前言
上一篇文章介绍了用 ItemDecoration 实现物流时间轴样式的一个例子,接下来,再来看一个比较常见的功能:粘性头部分组功能。
我们先来看一下今日头条中选取位置信息时的效果:
可以看到这个效果包含下面几个点:
- 数据分组展示
- 分组头部悬停
- 两个分组头部相遇时上面的分组头部被缓缓推出,同时透明度发生变化
下面就来借用 ItemDecoration 来一点点实现它。
在了解 ItemDecoration 之前,这个功能的实现可能会采取在 item 中包含用于展示城市数据的控件和展示头部分组的控件,然后只有每组的第一个数据展示分组控件,其余默认隐藏掉。那现在要用 ItemDecoration 来实现,其实也很简单,每个头部分组就是一种特殊的分割线,组内其他元素采用另一种分割线。
有了思路,然后让我们先开始造一点用于展示的数据,这里我把一些市区信息存在 json 文档中。为了便于我们在 ItemDecoration 类只进行分割线的绘制,所以我这里对数据提前进行处理,确保在绘制分割线之前,已经知道哪些数据是分组的头部,哪些数据是组内其他元素。
分组逻辑为:第一个数据肯定是分组的头部,然后从第二个数据开始,拿当前数据和上个数据进行比较,如果首字母相等,说明当前数据仍然是这个分组内的数据,如果不一样,说明产生了新的分组,那么当前这个数据就是这个分组的头部。
下面是部分进行数据处理的代码(默认数据已经按首字母分组):
1 | List<CityBean> cityBeans = JSONArray.parseArray(cityJson, CityBean.class); |
接下来我们来绘制分割线。首先需要设置 getItemOffsets()方法,为 item 预留出分割线的位置(分组头部分割线高 20dp,其余组内元素分割线 1px):
1 | /** |
然后在 onDraw() 或 onDrawOver() 方法中进行分割线的绘制。我们知道,这两个方法的区别是 onDraw() 的绘制顺序早于 item 的绘制,所以会被 item 覆盖,而我们接下来是要实现悬停的功能,也就是头部分组的分割线要始终在 最上层,不能被 item 覆盖。所以,我们这里采取在 onDrawOver() 方法中进行分割线的绘制。
1 | @Override |
运行,看下效果:
可以看到,分组功能已经实现。下面接着看第二要点:头部悬停
2.设置头部悬停
实现头部悬停的原理也很简单:不管当前元素是不是分组内的第一个元素,只要是当前 RecycleView 可见的第一个 item ,就需要绘制分组头部。
因为我们在 onDrawOver() 方法中根据 parent.getChildCount() 获取到的就是可见的 item ,所以下面稍微改动下 onDrawOver() 方法,添加第一条可见 item 逻辑判断:1
2
3
4
5
6
7
8
9
10
11
12
13
14
15
16
17
18
19
20
21
22
23
24
25
26
27
28
29
30
31
32
33
34
35
36
37@Override
public void onDrawOver(@NonNull Canvas canvas, @NonNull RecyclerView parent, @NonNull RecyclerView.State state) {
canvas.save();
//获取文字基准等信息
float topTxt = fontMetrics.top;
float bottomTxt = fontMetrics.bottom;
int baseLineY = (int) (topTxt/2 + bottomTxt/2);
final int childCount = parent.getChildCount();
//遍历 ReycleView 当前可见 item
for (int i = 0; i < childCount; i++) {
final View child = parent.getChildAt(i);
final int position = parent.getChildAdapterPosition(child);
CityBean cityBean = cityBeanList.get(position);
//获取分组字母
final String text = cityBean.getPinyin().substring(0,1).toUpperCase();
//可见的第一条数据不管是不是分组的第一个,都要绘制分组 header
if (i == 0){
paint.setColor(context.getResources().getColor(R.color.gray));
//获取 recycleview 的 paddingTop 的值,防止悬停头部分组位置计算不对
int top = parent.getPaddingTop();
//绘制40px的矩形框
canvas.drawRect(0,top,parent.getRight(),topOffset,paint);
paint.setColor(context.getResources().getColor(R.color.black));
//绘制分组字母文字
canvas.drawText(text,30,top+topOffset/2-baseLineY,paint);
}else {
//可见的非第一条数据,如果是分组的第一条数据,绘制分组头部
if (cityBean.isGroupFirst()){
paint.setColor(context.getResources().getColor(R.color.gray));
canvas.drawRect(0,child.getTop()-topOffset,parent.getRight(),child.getTop(),paint);
paint.setColor(context.getResources().getColor(R.color.black));
canvas.drawText(text,30,child.getTop()-topOffset/2-baseLineY,paint);
}
}
}
canvas.restore();
}
然后运行,看下效果:
可以看到,头部悬停功能已经很好的实现了。但是跟头条比,在两个头部相遇切换的时候比较生硬,可以仔细看一下动图的最后面一部分,下一个分组头部是直接覆盖掉上一个分组头部的。
所以,接下来,一起来看下第三部分推动效果的实现。
3.设置推出动画效果
首先,再来仔细的看一下这个推出的过程:
然后这里截取一下整个过程中的几个片段: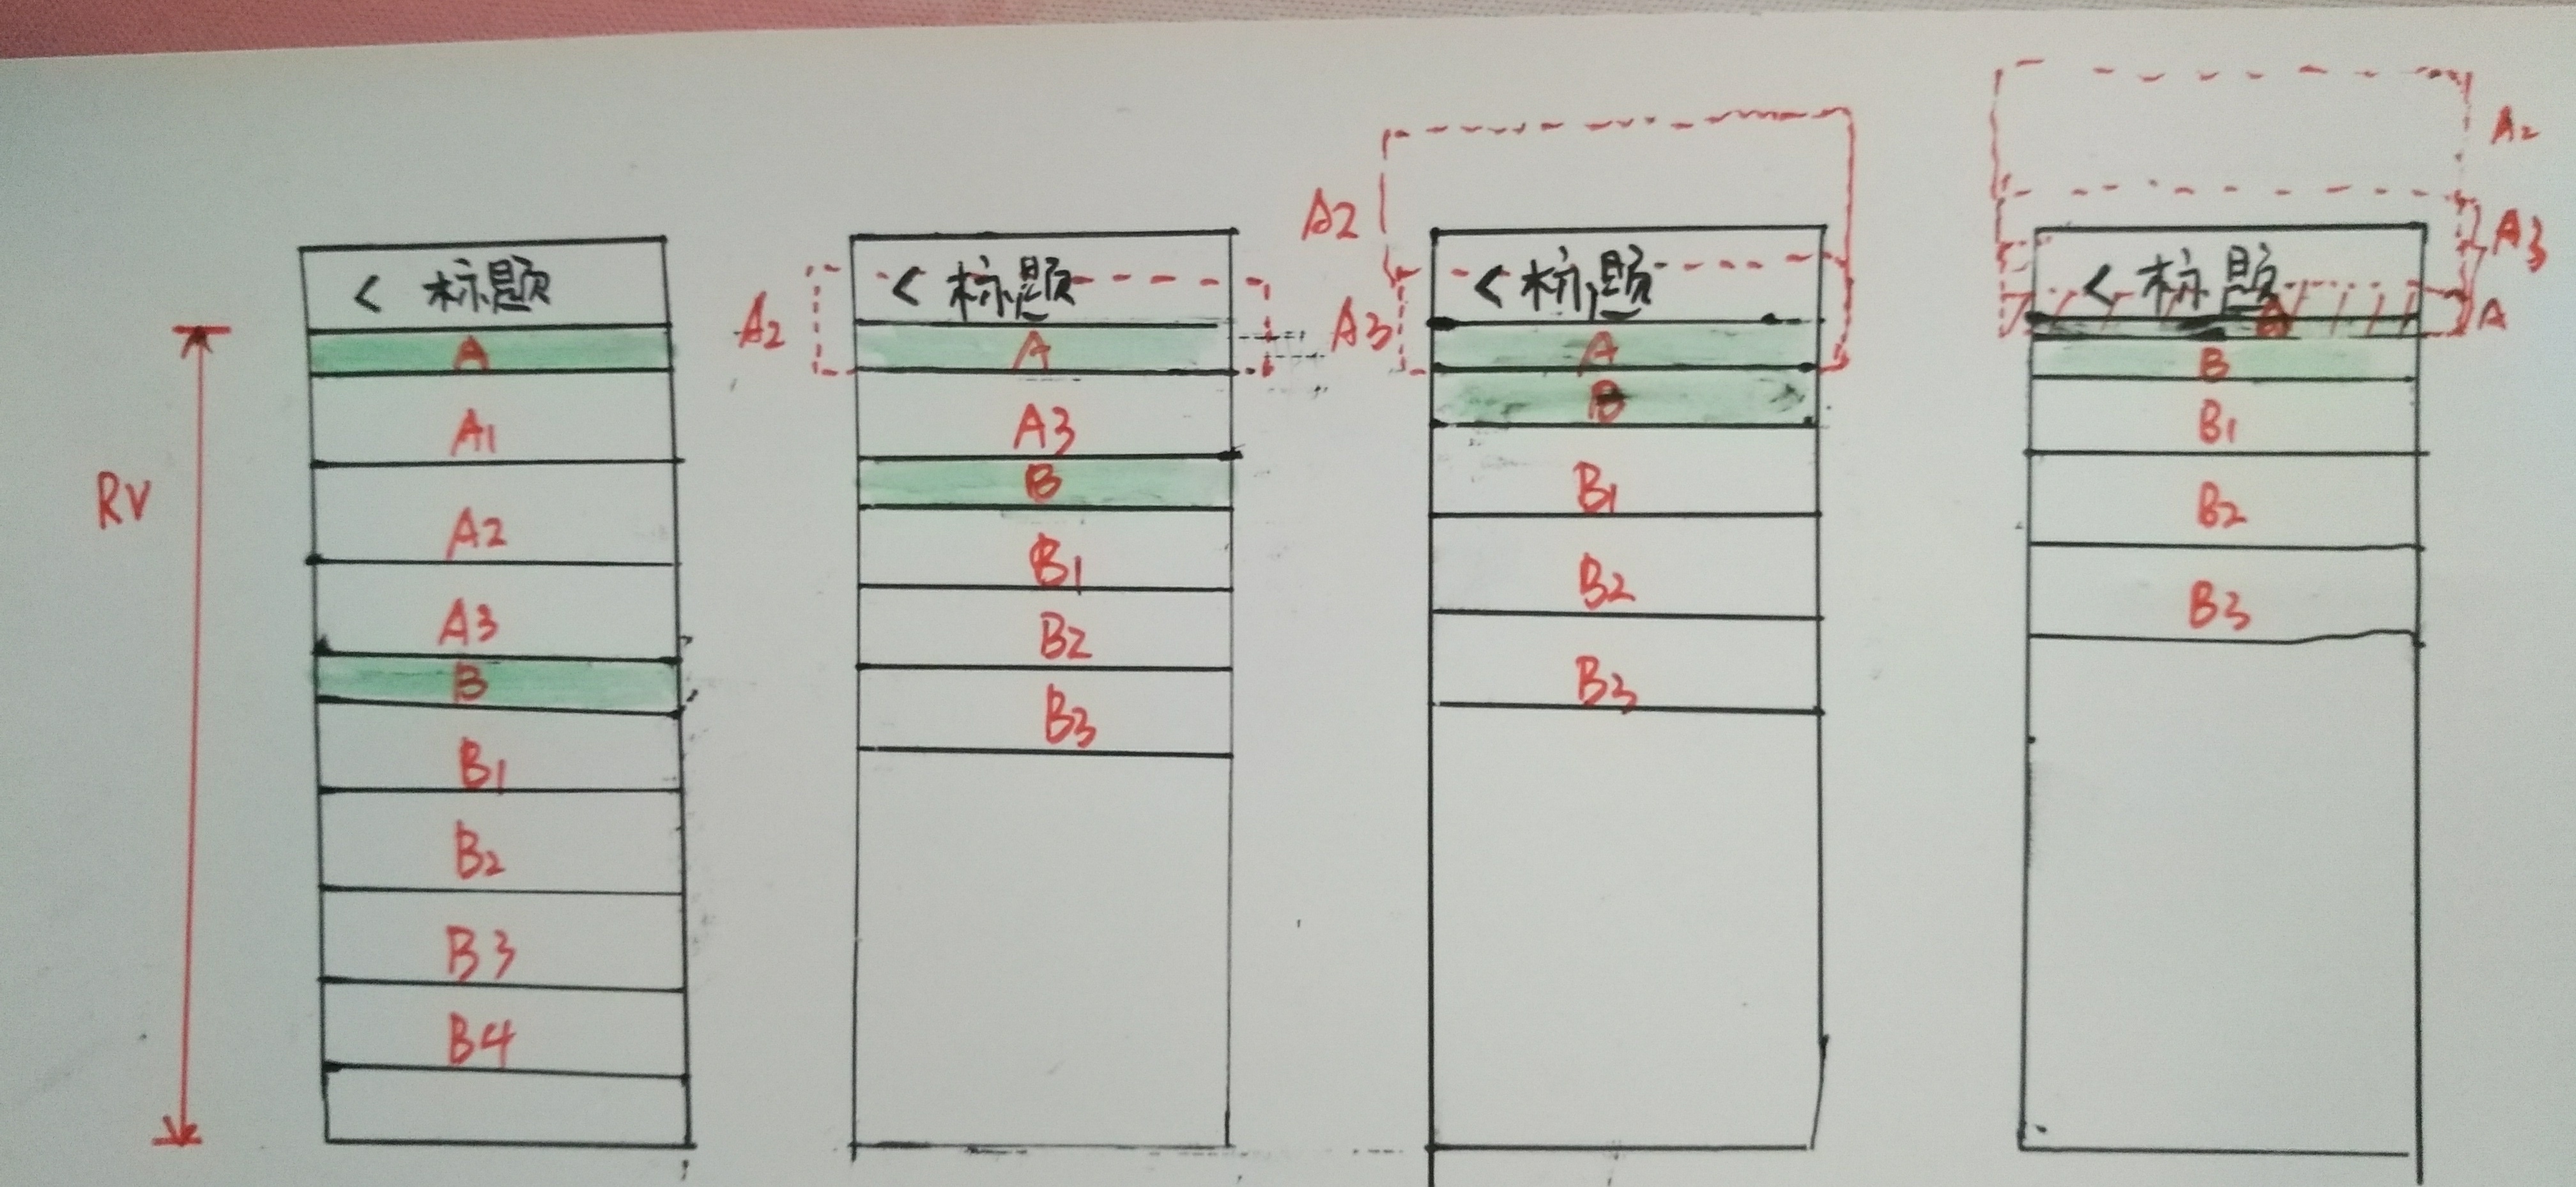
仔细分析一下这个图,然后思考下下面几个问题:
Q:什么时候两个头部分组快要相遇了?
A:由图一到图二,分析可知,是 A3 这个 item 慢慢的靠近区分 A,A2 这个 item 慢慢滑出屏幕,A3 成为 RecycleView 的第一个可见的 item 的时候。
而 A3 有没有什么特殊的地方?有的,A3 是 A 这个分组组内的最后一个元素。
Q:两个分组头部相遇的临界点满足什么条件?
A:由图三分析,临界条件为 A3 成为 RecycleView 第一个可见元素,并且 A3 这个 item 的 bottom 坐标值是分区 A 的 bottom的坐标值, A3 的 bottom 坐标值 - A 的高度 = RecycleView 的 可见上边界值(RecycleView 起点,去掉 RecycleView 的 paddingTop)
Q:两个分组头部相遇后,A 分区的坐标值怎么变化?
因为我们是需要在onDrawOver() 方法中绘制 A 区域,所以需要计算 A 的 top 坐标值 和 bottom 坐标值,由图四可以得出,A 的 top 值 = A3的 bottom - A 的高度,并且这个值肯定是小于 0(或者 RecycleView 的 paddingTop 值)
来看一下具体代码实现:
首先我们需要判断一条数据是不是组内的最后一条数据,所以改造下最开始的数据处理部分的代码,加上设置是否是组内最后一条数据的标志:
1 | for (int i = 0; i < cityBeans.size() ; i++) { |
然后修改一下 onDrawOver() 方法中 第一条可见数据时的逻辑:1
2
3
4
5
6
7
8
9
10
11
12
13
14
15
16
17
18
19
20
21
22
23
24
25
26
27
28
29
30
31
32
33
34
35
36
37
38
39
40
41
42
43
44
45
46
47
48@Override
public void onDrawOver(@NonNull Canvas canvas, @NonNull RecyclerView parent, @NonNull RecyclerView.State state) {
canvas.save();
//获取文字基准等信息
float topTxt = fontMetrics.top;
float bottomTxt = fontMetrics.bottom;
int baseLineY = (int) (topTxt/2 + bottomTxt/2);
final int childCount = parent.getChildCount();
//遍历 ReycleView 当前可见 item
for (int i = 0; i < childCount; i++) {
final View child = parent.getChildAt(i);
final int position = parent.getChildAdapterPosition(child);
CityBean cityBean = cityBeanList.get(position);
//获取分组字母
final String text = cityBean.getPinyin().substring(0,1).toUpperCase();
//可见的第一条数据不管是不是分组的第一个,都要绘制分组 header
if (i == 0){
paint.setColor(context.getResources().getColor(R.color.gray));
//获取 recycleview 的 paddingTop 的值,防止悬停头部分组位置计算不对
int top = parent.getPaddingTop();
//是分组内最后一个元素
if (cityBean.isGroupLast()){
//计算头部推出后的top的坐标值
int diffTop = child.getBottom() - topOffset;
//需要推出去了
if (diffTop < top){
top = diffTop;
//设置推出去后的分组头部颜色浅一点
paint.setColor(context.getResources().getColor(R.color.gray_light));
}
}
//绘制40px的矩形框
canvas.drawRect(0,top,parent.getRight(),topOffset,paint);
paint.setColor(context.getResources().getColor(R.color.black));
//绘制分组字母文字
canvas.drawText(text,30,top+topOffset/2-baseLineY,paint);
}else {
//可见的非第一条数据,如果是分组的第一条数据,绘制分组头部
if (cityBean.isGroupFirst()){
paint.setColor(context.getResources().getColor(R.color.gray));
canvas.drawRect(0,child.getTop()-topOffset,parent.getRight(),child.getTop(),paint);
paint.setColor(context.getResources().getColor(R.color.black));
canvas.drawText(text,30,child.getTop()-topOffset/2-baseLineY,paint);
}
}
}
canvas.restore();
}
至此,整个逻辑完成,运行,看一下效果:
总结
关于 ItemDecoration 类的使用就到这里了,结合这几篇文章,我们可以发现,只要是用到 ItemDecoration 类实现的,步骤都很固定,第一步利用 getItemOffsets()方法,为 item 预留出分割线的位置,第二部在 onDraw()或 onDrawOver() 方法中进行绘制。
其实比较难的就是分析实现的过程,和各个点坐标的计算。
参考
https://blog.csdn.net/briblue/article/details/70211942
https://juejin.im/post/5a4551ce51882512d82305cb
https://developer.android.com/reference/android/support/v7/widget/RecyclerView.ItemDecoration